
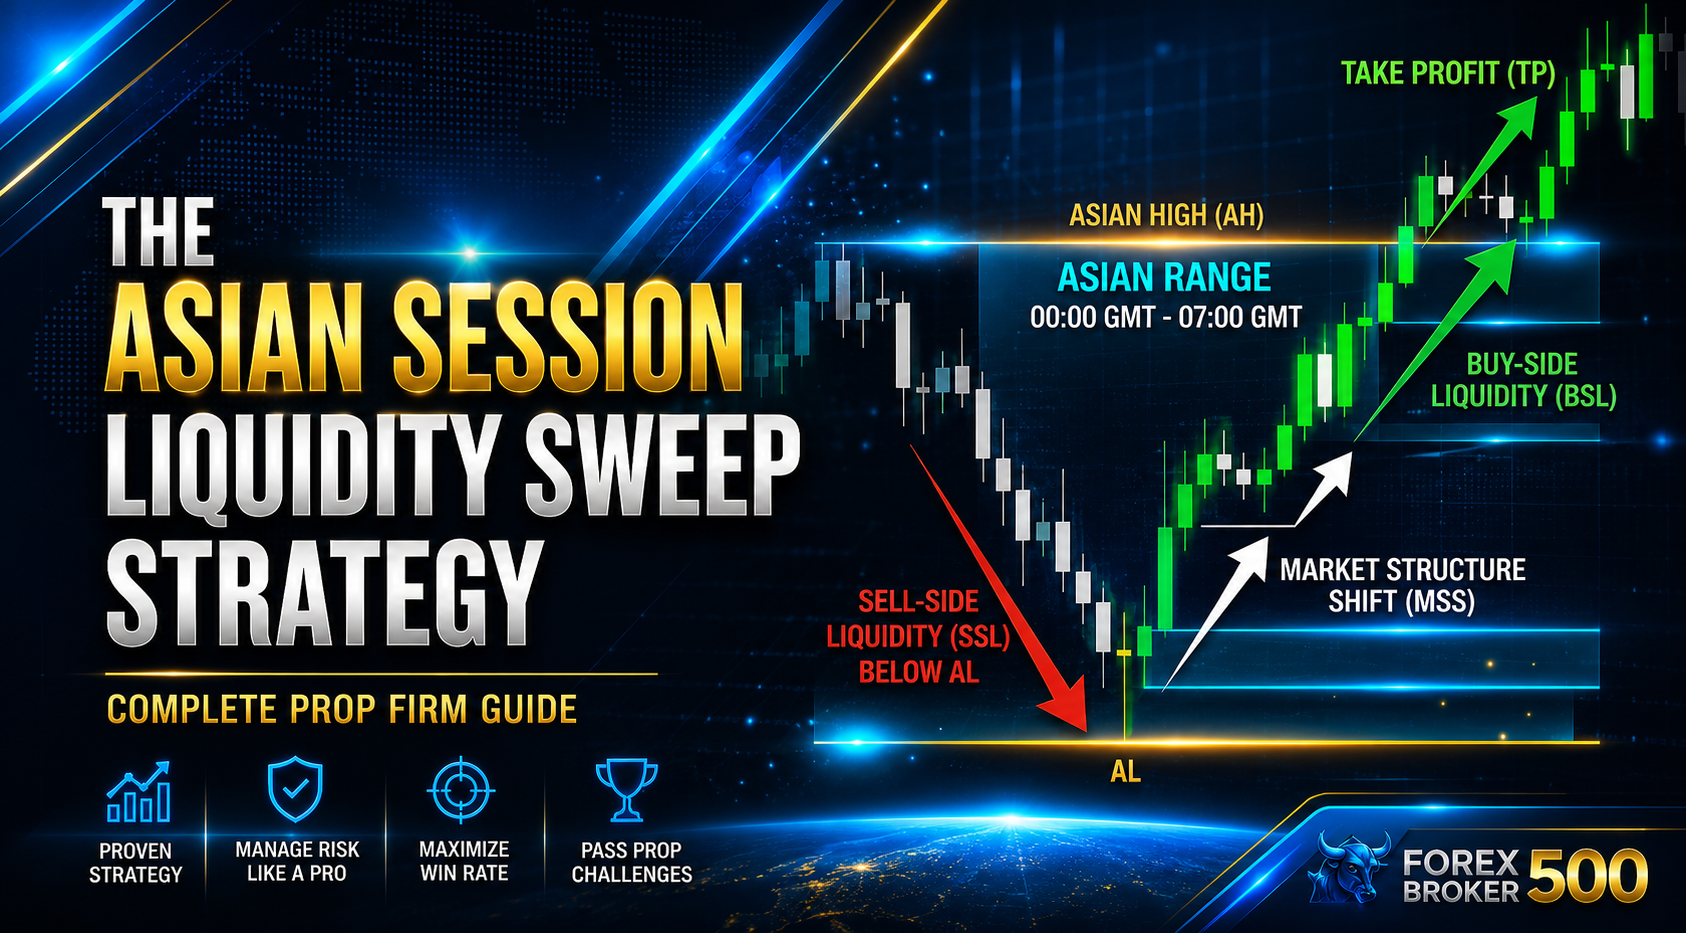
The Asian Session Liquidity Sweep Strategy is one of the most reliable, time-based mechanical trading setups used by institutional algorithmic traders and funded prop firm traders.
While retail traders often dismiss the Asian trading session as “slow” or “consolidative,” Smart Money views the Asian range as a liquidity engineering zone. The tight range formed during the Asian session builds massive pools of stop losses above its highs and below its lows. When the London or New York session opens, market makers intentionally drive price past these levels to capture liquidity before initiating the real daily expansion.
Understanding how to identify and trade these sweeps gives you a repeatable framework for passing prop firm challenges while keeping risk tightly controlled.
Why the Asian Range Creates High-Probability Liquidity Pools
Between 00:00 GMT and 07:00 GMT (Tokyo/Sydney sessions), global trading volume is lower compared to the overlap of the London and New York sessions. Because major institutional volume is absent, price gets locked into a horizontal range.
Retail traders place two types of orders around this range:
- Stop-Loss Protection: Traders inside the range place stop losses directly above the highest point or below the lowest point.
- Breakout Orders: Breakout traders set buy stop or sell stop orders outside the range boundaries.
This creates concentrated Liquidity Pools:
- Buy-Side Liquidity (BSL): Resting above the Asian High (AH).
- Sell-Side Liquidity (SSL): Resting below the Asian Low (AL).
When European financial centres open during the London Kill Zone (07:00 – 10:00 GMT), institutional algorithms search for these exact pools to fill large orders before executing the true directional move of the day. Recognising this mechanic is a core component of mastering the anatomy of a liquidity hunt.
The 4-Step Asian Liquidity Sweep Execution Framework

To keep execution fully objective and eliminate guesswork, follow this step-by-step mechanical checklist:
1. Mark the Asian High and Low (00:00 – 07:00 GMT): Establish the Liquidity Boundary.
Set your chart to the 15-minute (M15) timeframe. Highlight the highest wick and lowest wick formed strictly between 00:00 GMT and 07:00 GMT.
- Asian High (AH): Target pool for Buy-Side Liquidity (BSL).
- Asian Low (AL): Target pool for Sell-Side Liquidity (SSL).
2. Wait for the London Liquidity Grab: Look for Wick Spikes, Not Body Closes.
During the London Kill Zone (07:00 – 10:00 GMT), watch for price to aggressively push past either the Asian High or Asian Low.
Look for a sharp spike (wick) that purges the level and quickly rejects. If a candle closes a full body far beyond the Asian range with high momentum, it may be a true directional expansion rather than a sweep. You are explicitly looking for a fakeout/rejection wick.
3. Confirm Market Structure Shift (MSS): Drop to Lower Timeframes (M1 / M5).
Once the Asian Liquidity Sweep occurs, drop down to the 1-minute or 5-minute timeframe to confirm institutional displacement.
- For a Sell-Side Sweep (Bullish Setup): Look for price to break the most recent M5 swing high, leaving behind a Fair Value Gap (FVG) or bullish Order Block.
- For a Buy-Side Sweep (Bearish Setup): Look for price to break the most recent M5 swing low, leaving behind an inverted FVG or bearish Order Block.
4. Set Entry, Stop Loss, and Take Profit: Execution with Fixed Risk Parameters.
Enter on a limit order or market execution upon price returning to the newly formed Fair Value Gap or Order Block.
- Stop Loss: Place your SL 1 to 2 pips beyond the extreme wick of the sweep.
- Target 1 (TP1): The opposite side of the Asian Range (e.g., if buying an SSL sweep at the Asian Low, target the Asian High).
- Target 2 (TP2): Next key daily liquidity pool or major higher-timeframe imbalance.
Bullish vs. Bearish Asian Sweep Setup Rules
| Setup Parameter | Bullish Asian Sweep (Buy Setup) | Bearish Asian Sweep (Sell Setup) |
| Prerequisite | Price sweeps below the Asian Low (AL) | Price sweeps above the Asian High (AH) |
| Trigger Zone | Liquidity grab taking out Sell-Side Liquidity (SSL) | Liquidity grab taking out Buy-Side Liquidity (BSL) |
| Lower Timeframe Signal | M1/M5 Bullish Market Structure Shift + FVG | M1/M5 Bearish Market Structure Shift + FVG |
| Entry Point | Limit order at the top of the M5 Bullish FVG | Limit order at the bottom of the M5 Bearish FVG |
| Stop Loss | 1-2 pips below the lowest wick of the sweep | 1-2 pips above the highest wick of the sweep |
| Primary Take Profit | Asian High (AH) level | Asian Low (AL) level |
Why This Strategy Succeeds on Prop Firm Challenges
Prop firm evaluation rules penalise unpredictable drawdown and poor risk control. Incorporating an Asian Liquidity Sweep into your broader trading system offers critical structural advantages:
- Tight Stop Losses: Because entry occurs immediately following a sweep and structural shift, stop losses are defined and tight (often 3 to 7 pips on majors like EUR/USD or GBP/USD).
- Asymmetric Risk-to-Reward (R: R): Aiming for the opposite side of the Asian range consistently yields 1:3 to 1:5 R: R ratios.
- Strict Time Windows: Trading is restricted to defined Kill Zones, avoiding overtrading during choppy off-hours.
This approach pairs seamlessly with the timing principles covered in our guide on how to use the London breakout strategy to pass prop firm challenges and aligns with proven systems detailed in our benchmark best FTMO challenge strategies passing guide.
Pass Your Prop Challenge with Institutional Precision
Stop relying on lagging indicators or risking your capital on unproven setups. Master a complete, mechanical execution system built specifically for passing evaluations and managing funded capital.
Get full access to our exact rules, risk parameters, and execution templates:

No responses yet